The Aastra 6731i IP phone offers advanced features, including 10 fixed feature keys, HD wideband audio…
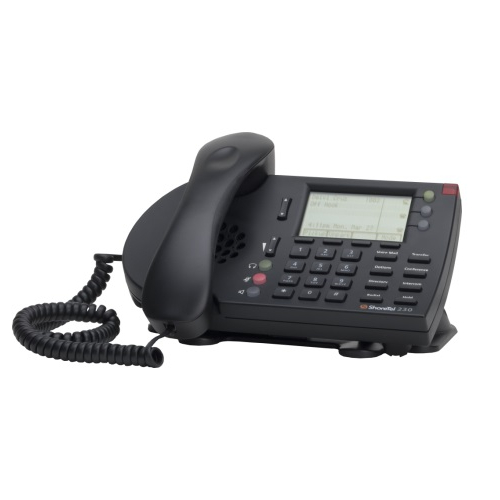
ShoreTel 230 IP Phone: Accessing Voicemail
If you have the ShoreTel 230 IP phone, a steady flashing light one your phone’s right-most upper corner and stutter dial tone will signify that you have unheard messages. The number of unheard messages will be displayed on your phone’s idle screen next to the voicemail icon. To learn how to access your voicemail and interact with voice messages, follow these steps.
Logging Into The Main Menu
To log in to the main voicemail menu, press the Voice Mail button and then dial your password followed by #. (Your default password is 1234.)
Logging In From Another Extension
To log in to the main voicemail menu from another extension, press the Voice Mail button, followed by #, then your extension, followed by your password, and then #.
To log in to the main voicemail menu from an analog phone, press # #, then your extension, followed by your password, and then #.
Logging In From An External Phone
To log in to the main voicemail menu from an external phone, dial the voice mail access number provided by your System Administrator, press #, then your extension, then your password, followed by #.
Listening To & Interacting With New Messages
From the Main Menu, you can listen to and replay new messages by pressing 1. To interact with new messages, press:
1 to Replay the message
2 to Save the message
3 to Delete the message
4 to Forward the message
- After recording the prefacing remark, press: # if correct, 1 to review, 2 to re-record, or * to cancel recording.
- After addressing the message, press 1 to mark it urgent, or simply hang up to send the message.
5 to Reply to the message
- Choose one of the following options: 1 to reply with a voice message, 2 to reply with a call back, or * to return to the previous menu.
6 to hear Envelope Information (time and date sent)
7 to Move Backward
- While listening to a message, you may “rewind” to several second earlier in the message.
8 to Pause
9 to Move Forward
- While listening to a message, you may “fast forward” to several seconds later in the message.
0 followed by 0 to Transfer to Assistant
- While listening to a message, you may contact the assistant to inquire or share information about a voicemail.
# to Continue to the next message
* to Cancel message review
Sending Messages From Voicemail
From the Main Menu, you can send messages by pressing 2. The following options are available while recording your message:
* Cancel
# Done recording
1 Review
2 Re-record
After you are satisfied with your recording, you will be prompted to enter the recipient’s extension. At this time, you have the option to press:
0 for additional addressing options
1 Look up recipient by name in a directory
2 Specify a personal distribution list
3 Broadcast to all extensions
* Cancel addressing options
After the message is addressed, if desired, you can press 1 to mark/unmark urgent or 2 to request a return receipt.
Listening To Saved Messages
From the Main Menu, you can listen to saved messages by pressing 3. To interact with saved messages, press any one of the options under “Listening To & Interacting with New Messages” (except for option 2) above.
Mailbox Options
Press 7 to access various options for your personal mailbox, and then press one of the following:
1 Record Personal Greeting
- Note: When you record a personal greeting, it is linked to the current active call handling mode.
- Record your personal greeting for the current active call handling mode at the tone and press #, then select from the following options: # to Accept, 1 to Review, 2 to Re-record, 3 to Delete, * to Cancel.
2 Choose Call Handling Mode
- For more information on call handling, see your System Administrator. The following modes and options are available: 1 – Standard, 2 – In A Meeting, 3 – Out Of The Office, 4 – Extended Absence, 5 – Custom, or * – Cancel.
3 Reassign Extension
- If you have the proper permission, you can assign your extension to any phone. The following options are available:
1 Assign the extension (Note: If you assign your extension to a phone that is normally occupied by another user, calls to the original user’s extension will go to the forwarding destination as defined by their active Call Handling Mode.)
2 Unassign the extension (the phone reverts to the extension originally assigned to it)
3 To assign your extension to your last external number
4 Set Your Password
- Enter your new password, followed by # and repeat to confirm. Press * to cancel.
5 Disable/Enable Envelope Information
- Use this option to turn on/off the envelope information which contains the date/time of the message, caller ID and/or the recorded name of the person who left the voicemail message.
6 Record Your Name
- Press # when you are finished recording your name, then choose from the following: # – Accept, 1 – Review, 2 – Re-record, 3 – Delete and use default system recording, or * – Cancel.
7 Listen To Your Deleted Messages
- As a safeguard against accidental erasures, the system retains deleted messages for a few hours. To listen to your deleted messages, press 7. Voicemail plays all the deleted messages still available to the system. During playback, you can manage deleted messages as if they were newly arrived messages. Press 2 to restore the deleted message to a saved message.
8 Remove Deleted Messages
- Press 1 to Confirm or press * to Cancel.
9 Additional Options
The following additional options are available:
1 Enable or disable Outlook automated call handling
2 Change email delivery options: 1 – Disable email delivery, 2 – Enable email delivery, 3 – Enable email delivery with voice message attached, or 8 – Mark voice messages heard after email delivery.
3 Change agent state: 1 – Log in and assign extension, 2 – Log out, or 3 – Log in without assigning extension.
5 Change Find Me forwarding state: By enabling Find Me, callers who are routed to your voice mail box can be instructed to press 1 and the voicemail system will call you at one of two possible numbers where you can be located. To set the Find Me destinations, use Personal Call Manager or Web Access. Press 1 to Enable or press 2 to Disable.
* Previous menu
* Cancel Current Operation
More Options
8 Log Off
9 Return To Auto-Attendant
0 Transfer To Assistant
# Hear Mailbox Status (select this option to hear the number of unheard messages).
And that is how you access and utilize your voicemail system via the ShoreTel 230 IP phone. If you have further questions, please see your System Administrator.
To purchase the ShoreTel 230 IP phone or any of our other new and refurbished business phones and phone systems, please visit Startechtel.com or call 800-564-8045. For the latest news and updates, connect with us on Facebook, Google+, Twitter, LinkedIn, and Pinterest.


Tags: Accessing Voicemail, Guide, How to, ShoreTel 230 IP Phone


