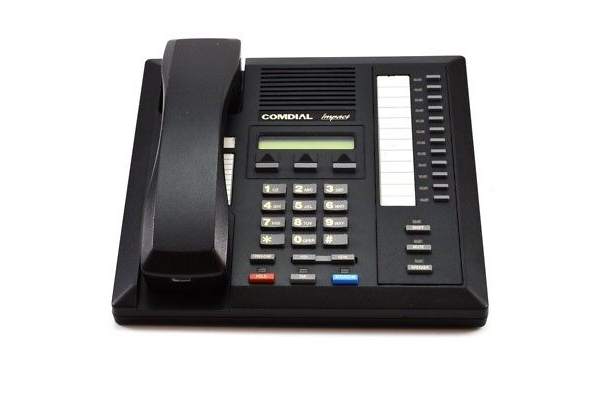
Making Conference Calls On The Comdial Impact 8012S Phone
 Conferencing allows you to connect with multiple phones on the same call. This makes it convenient for businesses to conduct meetings with remote workers or clients, eliminating travel expenses, expediting collaboration and boosting productivity.
On the Comdial Impact 8012S phone, you can make conference calls with up to five parties, including you as the originating party, in any combination of outside lines and intercom parties.
Note: When setting up a conference call with outside lines and internal telephones, you must call the outside lines first.
Conference Calls
- To set up a conference call that includes any combination of outside lines and intercom parties:
- Make the first call.
- Select Conference, using the interactive button. The call is automatically placed on hold.
- Select next line and make the next call.
- Select Conference to establish the conference.
- Press the TRNS/CONF button to add more parties.
- To continue the conversation on the remaining line after other outside lines have dropped out of conference:
- Press HOLD.
- Press the line button of the remaining party.
- To retrieve a line from hold and bring that party back into the conference:
- Press TRNS/CONF.
- Press line button.
- Press TRNS/CONF.
Unsupervised Conference Calls
If you are involved in a conference call with two outside lines, you can drop out of this established conference call and leave the outside lines in the conference with each other (known as an unsupervised conference call).
- To drop out of a conference call you initiated involving outside lines (creating an unsupervised conference):
- Dial # (lines remain lighted and in use until one or both outside parties disconnect; when only one party drops out of an unsupervised conference, the other party remains on hold until he hangs up or the line is answered).
- To rejoin an unsupervised conference between two outside lines:
- Press TAP.
- To drop a party out of a conference call:
- Select Drop Party.
- Select the party you wish to drop from the conference call by pressing the interactive button beside the appropriate line.
If you have further questions regarding conference calls on your Comdial Impact 8012S phone, please see your System Administrator.
Find this Comdial phone and many more new and refurbished business phones and systems online at Startechtel.com! Please feel free to call 800-564-8045 if you have questions regarding our inventory. You can also connect with us on Facebook, Google+, Twitter, LinkedIn, and Pinterest.
Posted in Business Communications, Comdial Phones | Comments Off on Making Conference Calls On The Comdial Impact 8012S Phone
Using Voice Mail Features On The Vodavi Starplus STS Phone
 The Vodavi Starplus STS phones offer a wide variety of exceptional features, making it a great asset for any business office. Affordable and attractive, Vodavi Starplus STS phones are easy to use thanks to their smart design. Some of its excellent features include call transfer, conferencing, and voice mail. To learn how to use the Voice Mail features on the Vodavi Starplus STS phones, follow these steps.
Call Forwarding To Voice Mail Groups
Callers may be routed directly to your mailbox by forwarding your phone to a voice mail group.
1. Lift handset or press ON/OFF.
2. Press FWD or dial 640.
3. Dial the desired code:
6 = All Calls
7 = No Answer
8 = Busy
9 = Busy/No Answer
4. Dial the 3-digit Voice Mail group pilot number where calls are to forwarded (440-447 = voicemail groups 1-8). A confirmation tone will sound.
5. Replace handset or press ON/OFF.
Retrieving Voice Messages
To enter the Voice Mail system to check for mail:
- Either dial Voice Mail group number, press preprogrammed VM GROUP flexible button, press flashing MESSAGE WAIT button, or use the Soft Key’s VM1 option (group 440 only). You will be prompted to enter your mailbox password.
Voice Mail Transfer With ID Digits
While on a call and the caller on the other end wishes to leave a Voice Message for another VM user:
1. At the initiating station, press the TRANS button.
2. Dial the Voice Mail Group number or press the preprogrammed VM GROUP flexible button.
3. Dial the VMID (Mailbox location) of the desired party and go on-hook.
Voice Mailbox Button
To program a Mailbox flexible button:
1. Press the SPEED button twice.
2. Press the desired flexible button to be programmed.
3. Dial the Mailbox feature code (460-467 = voice mail locations 1-8).
4. Dial the VMID number.
Voice Mail Group Button
To program a VM GROUP flexible button:
1. Press the SPEED button twice.
2. Press the desired flexible button to be programmed.
3. Dial a 3-digit VM Group number (440-447 = VM groups 1-8).
4. Dial the VMID number.
Voice Mail Group Access
To access a VM Group:
- Dial VM Group number (440-447)
OR - Press preprogrammed VM GROUP flexible button
OR - Use the Soft Key’s VM1 option when in an idle condition (to access group 440 only).
Voice Mail One-Touch Recording
The Voice Mail One-Touch Recording feature allows the station user, while on an internal/external call, to press a preprogrammed flexible button or Soft Key and have the system record the conversation in the station user’s mailbox.
Warning: Use of this feature when the One-Touch Recording Warning Tone is disabled may be interpreted as a violation of federal, state or local law, and an invasion of privacy. Check applicable laws in your area before recording calls using this feature.
Note: The “MiniVoice” system does not support Voice Mail One-Touch Recording.
To make a VM RECORD flexible button:
1. Press the SPEED button twice.
2. Press the desired flexible button to be programmed.
3. Dial feature code 649 + VVV (VVV = 440-447 for desired VM group).
While on an internal or external call:
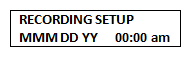
1. Press the preprogrammed VM RECORD button or use the Soft Key’s REC option (for VM Group 440 only). The LED will flutter red during the setup and the following message will display:
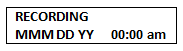
2. Once the system makes the connection, your mailbox and the flexible button LED will light solid green. The LCD will display the following message:
To pause or resume recording after a pause, press the preprogrammed 655 key.
3. When you finish recording, press the preprogrammed VM RECORD button or the Soft Key’s STOP option. The LED will extinguish and the normal LCD call information will display.
And that is how you use the Voice Mail features on your Vodavi Starplus STS phone. Please see your System Administrator for further questions.
Browse our stock of new and refurbished Vodavi Starplus STS phones and equipment at Startechtel.com or call 800-564-8045 to speak with a representative. Connect with us on Facebook, Google+, Twitter, LinkedIn, and Pinterest.
Posted in Business Communications, Vodavi Phone Systems | Comments Off on Using Voice Mail Features On The Vodavi Starplus STS Phone
Conference Room Trends 2019
 Happy New Year! As we get the New Year started, let’s take a look at the way conference rooms will advance and improve this year. These are some of the popular conference room camera trends we will soon see.
- ePTZ (electronic Pan/Tilt/Zoom)
There are two ways that PTZ cameras can pan, tilt and zoom – via motors that physically adjust the camera, or by digitally altering a static camera to give the desired pan, tilt, zoom effect. With ePTZ, because the actions are not being done at the camera level, it can be a great benefit in the conference room. Each user can manipulate their view as desired, and ePTZ provides a faster response. Additionally, because ePTZ is done digitally with software, the cameras are less complex, and thus, less expensive than traditional PTZ cameras.
- Intelligent Framing/Auto Tracking
These cameras automatically pan, tilt, and zoom the camera to keep meeting attendees in view even if they are moving. For example, if a speaker stands to interact with a whiteboard or presentation, the camera will automatically adjust to keep the speaker in view. On a related note, audio tracking technology is in the works to keep whoever is speaking in the field of view.
- People Analytics
Data analytics within these cameras can be used to count people. This helps to provide data on conference room use, or the number of participants on a particular conference call. Eventually, facial recognition technology will be able to identify meeting attendees for automatic recordkeeping. This technology can also be used for security and attendance at schools.
- Object Identification
New cameras can now identify and count different types of objects in the field of view. When it comes to conference rooms, it can be applied as a new accurate form or people counting by counting the number of heads in a room.
- Virtual Reality
While videoconferencing already enhances a phone call, virtual reality creates a more immersive experience. With virtual reality, it looks as if participants are actually in the same room, allowing for better interpretation of body language and subtle eye movements. With this type of technology, you can experience more natural communication with others remotely. The challenge with this technology is that wearing a VR headset for an hour long meeting is not quite ideal. However, as these technologies advance, there is potential for VR in the conference room.
Which trends are you most excited to see in the conference room? Share with us on Facebook, Google+, Twitter, LinkedIn, and Pinterest.
Visit Startechtel.com to browse our wide selection of conference phones, business phones, and much more. If you have any questions or need assistance, please contact us at 800-564-8045.
Posted in Business Communications, Business Trends, Conference Phones, Video Conference, Video Conferencing | Comments Off on Conference Room Trends 2019
New Year’s Resolutions
 It’s amazing to think that another year has come and gone. How did your New Year’s resolutions fare this year? Well, next year, you can plan for success. Here are some New Year’s resolutions ideas that can help you become a better you.
- Get Up Earlier
For the morning people, this need not apply. But for us that dread the alarm and hit snooze repeatedly, this can help change your daily habit. You can use that extra time for numerous things, such as preparing breakfast, exercise, or meditation. Regardless of what you do with the extra time, you will find that it helps to increase your productivity. For the night owls, you may want to ease into it by getting up 10 minutes earlier per day until you’ve reached your goal. - Master Something
In 2019, pick one thing you have always wanted to be good at and hone your craft. Very few of us have mastered one this specifically because we have various interests and our time is spread too thin. From learning to play an instrument to writing a book to improving your cooking skills, focus on one for better results. - Meditate
Taking some time to meditate daily is known to help reduce stress, improve sleep, and promote better emotional health, among other benefits. Much like waking up earlier, meditation can and should become a habit. There are apps to help keep you on target, and you can do as little as 10 minutes a day or more if you have the time to spare. - Give More
While this doesn’t necessarily mean financially, giving can prove more beneficial than receiving. In general, helping others and being generous increases happiness. Find some time and/or resources that you can donate (ex. donating to a food drive, volunteering for charity work) and do it. - Set Your Intention
What do you want to accomplish in 2019? Sometimes simply putting what you want into the universe can help your goals come to fruition. Think of it as planting a seed. By setting your intention for the year, it is there as a reminder for you to continue to work at it daily.
What are your New Year’s resolutions and how do you stick to them? Share with us on Facebook, Google+, Twitter, LinkedIn, and Pinterest.
Don’t forget! We will be closed on Monday December 31, 2018 and Tuesday January 1, 2019. Normal hours will resume on Wednesday January 2, 2019. The team at Startechtel.com is thankful for each and every one for you for making 2018 a great year. Wishing you a safe and Happy New Year!
Posted in Holidays | Comments Off on New Year’s Resolutions
Using Call Transfer On The Executone IDS M18 Phone
On the Executone IDS M18 phone, the Call Transfer feature allows you to send a call (internal or external) to another extension. If you transfer a call to a busy extension, the call is automatically camped-on as soon as you hang up.
Transfer A Call
1. While you are on a call (internal or external), press the TR/CON key.
2. Dial the desired destination or press the DSS key for the desired extension. You can dial one of the following destinations:
• An extension number – a double tone is heard if the called extension is programmed to receive Voice Announced calls. Otherwise the called extension will ring. Announce the call if needed. If the extension is busy or there is no answer, you may reconnect to the outside call by pressing OUTSIDE LINE key, or to the internal call by pressing TR/CON. If you do not wish to inform the called extension of the call (screen the call), replace the handset after dialing the extension number.
NOTE: If the transferred call is not answered in the set Transfer Recall time, an outside line call returns to your extension. If the called extension is forwarded, the transferred call may forward and not recall.
• An orbit zone (dial 50 through 59)
• A hunt group (dial 4 + the 2-digit hunt group number)
• An ACD group (dial 47 + the 2-digit ACD group number or dial 477 + the 2-digit ACD group number to screen the call to an agent)
3. Hang up the handset.
In addition, the Dial By Name feature can be used to transfer a call to an extension.
Transfer A Call Using Dial By Name
1. While you are on a call (internal or external), press the TR/CON key.
2. Dial 8.
3. Dial the name of the individual starting with the first character of their name (as programmed in the Directory) and continuing until the system finds a unique match in the directory, and rings the desired station. The characters Q, Z, and a space are dialed by using 1. For example, to dial Quigley by name, dial 1 8 4 4 5 3 9.
A double tone is heard if the called extension is programmed to receive Voice Announced calls. Otherwise the called extension will ring. Announce the call if needed. If you do not wish to inform the called extension of the call (screen the call), replace the handset after dialing the extension number.
NOTE: If the transferred call is not answered in the set Transfer Recall time an outside line call returns to your extension. If the called extension is forwarded the transferred call may forward and not recall.
4. Hang up the handset.
Transfer To VMS
VMS is an optional feature which provides the telephone system with an integrated voice message system. You can transfer an outside line call to the VMS, and allow the caller to follow voice prompts to check their messages or leave messages for other users. An outside line call can also be transferred directly to a VMS mailbox. Certain configurations also allow internal calls to be transferred to VMS and directly to VMS mailboxes.
Transfer A Call To The Voice Mail System
1. While connected to a call, press the TR/CON key. Internal dial tone is heard.
2. Dial 4 + the VMS hunt group number, usually 36 (VMS is usually hunt group 36, but can be any group 1 through 36). Confirmation tone (successive short beeps followed by dial tone) is heard.
Transfer A Call To An Individual VMS Mailbox
1. While on an outside call, press the TR/CON key. Internal dial tone is heard.
2. Dial 76 + the telephone extension number of the person the message is to be taken for. Confirmation tone (successive short beeps followed by dial tone) is heard. The outside caller hears the voice announcement of the person the message is being taken for.
OR
Dial 77 + the mailbox number of the person the message is to be taken for.
NOTE: Dial code 77 may not be available in your system. Check with your system manager.
Auto Transfer
Auto Transfer is designed for use with Direct Station Selection keys on extensions which transfer a large volume of calls. With Auto Transfer, an outside call can be transferred by pressing one of the DSS keys. There is no need to press the TR/CON key for each transfer.
NOTE: You cannot use Auto Transfer with an Agent Terminal.
Activate Auto Transfer
1. Without lifting the handset, press the TR/CON key. The TR/CON key LED lights. However, the TAPI-160 does not have a TR/CON key LED. When Auto Transfer is active, XFR appears on the first line of the display. Auto Transfer is activated.
Deactivate Auto Transfer
1. Without lifting the handset, press the TR/CON key. The TR/CON key LED goes out. Auto Transfer is deactivated.
And that is how you use the Call Transfer feature on the Executone IDS M18 phone. For further information, please see your system manager.
For a great selection of new and refurbished phones and equipment from top brands including Executone, please visit Startechtel.com. You may contact 800-564-8045 to speak with a representative directly, and you can find us on Facebook, Google+, Twitter, LinkedIn, and Pinterest.
Posted in Business Communications, Executone | Comments Off on Using Call Transfer On The Executone IDS M18 Phone
Answering Calls On The Nortel M7310 Phone
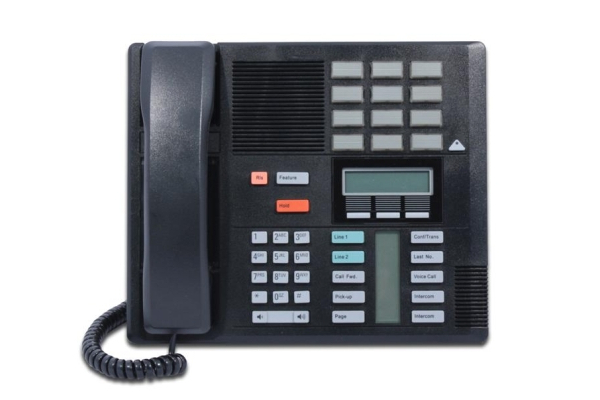 For a top quality, sturdy and reliable business phone, look no further than the Nortel M7310 phone. Designed for office environments with more extensive calling and call handling requirements, the Nortel M7310 phone is ideal for users who frequently call the same customers, clients, or suppliers.
Aside from its smart design and convenient features, it’s also easy to use. Follow these steps to learn how to answer calls on the Nortel M7310 phone.
While you still have a call appearance button available on your Nortel phone, you can receive incoming calls. The button icon on the call appearance will show a flashing ▲ icon.
To answer a call when idle:
1. If your phone is idle or you only have parked or held calls, you can answer calls in a number of ways:
• Pick up the handset.
• To answer handsfree, press the call appearance button or the Handsfree button.
2. The button icon changes to a steady icon to show it is the call to which you are connected.
To answer another call:
If you already have a call in progress, you can still answer another call. Pressing the alerting call appearance button will automatically put the current call on hold and answer the waiting call.
Switching between calls:
You can switch between calls by pressing the call appearance button of the call to which you want to talk. The button icons will show which call you are currently talking to.
• A slow flashing ▲ icon indicates a call waiting to be answered.
• A steady icon ▲ indicates the currently connected call.
• A fast flashing ▲ icon indicates a held call.
Divert A Call To Voicemail
You can redirect a call to voicemail without answering the call. This only applies for call to you, not calls to a group of which you are a member.
1. Press the To VM soft key or if your phone is idle press the Release button. The call is redirected to voicemail.
Ignore An Incoming Call
You can quiet the ringer of a currently alerting call. The call will continue alerting visually but with no audible ring. You can assign one of your phones programmable buttons as a Ringer Off button to turn the ringer on or off for all calls.
1. Press the Ignore soft key.
2. The call will continue alerting but with no audible ring.
Answering A Page Call
You can be paged if you have no call in progress or only held and or parked calls. After a single tone, the page is heard through the phone’s speaker. If you are currently on a call or set to do not disturb your phone is not paged.
To answer the page call, press the Answer soft key. The page call is turned into a normal call between just you and the pager.
And that is how you answer calls on the Nortel M7310 phone. Please see your System Administrator for more information.
To find a great selection of new and refurbished Nortel phone systems and much more, visit Startechtel.com. Browse our stock online or call 800-564-8045 to speak with us directly. You may also connect with us on Facebook, Google+, Twitter, LinkedIn, and Pinterest.
Posted in Business Communications, Nortel Networks, Nortel Norstar Phones | Comments Off on Answering Calls On The Nortel M7310 Phone
Call Forwarding On The NEC DSX Phone
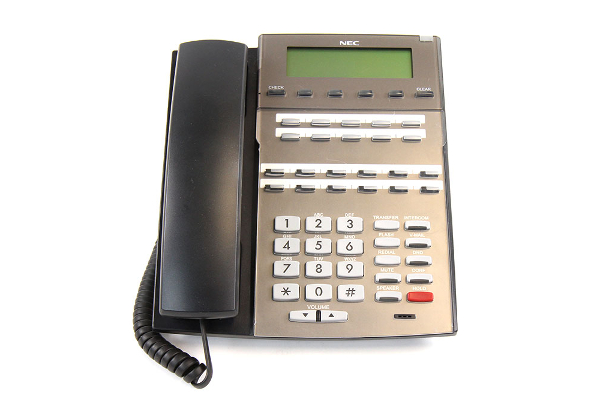 NEC DSX business phones offer a bevy of exceptional features, which includes Call Forwarding. Call Forwarding can be helpful for those who may not always be around since it ensures that the user’s calls are covered when they are away from their work area.
Call forwarding on NEC DSX business phones permits an extension user to redirect their call to another extension. The types of Call Forwarding are:
- Call Forwarding When Not Answered – Calls ringing the extension forward when not answered.
- Call Forwarding When Busy Or Not Answered – Calls ringing the extension forward when not answered, and all calls forward while the extension is busy.
- Call Forwarding Immediate – All calls to the extension forward immediately.
You can set up Call Forwarding to reroute all calls or just outside calls. If an extension with forwarding set for outside calls only receives a screened Transfer, the initial voice-announcement broadcasts at the extension. When the caller hangs up to complete the transfer, the outside call forwards as programmed.
Call Forward Chaining
Extension user’s can chain Call Forwards. For example, extension 301 can forward all calls immediately to 304, which in turn can forward all calls immediately to extension 302. Thus, any co-worker calling 301 or 304 goes to 302 instead. If extension 302 is Call Forwarded to voice mail, then callers to 301 or 304 go directly to 302’s mailbox.
Call Forwarding Cancel
Call Forwarding cancel allows a keyset user to dial a code to simultaneously cancel all Call Forwarding system-wide. The extension must have access level 4 or 5 set up – see your System Administrator for more information.
Call Forwarding Key
A keyset user can have a key on their telephone or DSS Console assigned as a Call Forwarding key.
- While the extension is idle, press the key puts the extension in the Call Forwarding programming mode – the same as pressing INTERCOM and dialing *3.
- If the extension has Call Forwarding enabled, and the user presses the key and waits (for at least 6 seconds), Call Forwarding is automatically cancelled.
- If the extension has Call Forwarding disabled, and the user press the key and waits (for at least 6 seconds), the prior Call Forwarding mode is automatically enabled (if any).
- While the extension is busy, pressing the key switches Call Forwarding on and off.
Call Forwarding Key BLF
Flash Rate:
- Off – Call Forwarding is disabled.
- Fast Flash – The extension is in the Call Forwarding programming mode.
- Slow Flash – Call Forwarding is enabled at the extension.
Call Forwarding Toggle In A Personal Speed Dial Bin
If an extension doesn’t have an available Feature Key for a Call Forwarding key, the user can program a Personal Speed Dial number for similar operation (without the BLF). To do this:
- While on hook, dial #77.
- Press the key for the Personal Speed Dial number you want to program + HOLD.
- For LINE/GRP/ICM, press INTERCOM + HOLD.
- For NUM, dial *3 + HOLD.
- For NA, enter a name of your choosing + HOLD.
- Press SPEAKER to exit.
While the extension is idle, pressing the key puts the extension in the Call Forwarding programming mode – the same as pressing INTERCOM and dialing *3.
- If the extension has Call Forwarding enabled, and the user presses the key and waits (for at least 6 seconds), Call Forwarding is automatically cancelled.
- If the extension has Call Forwarding disabled, and the user press the key and waits (for at least 6 seconds), the prior Call Forwarding mode is automatically enabled (if any).
Call Forwarding Confirmation Tone
Keyset users will hear a single confirmation beep after enabling or cancelling Call Forwarding. Single line telephone users will hear Intercom dial tone after enabling or cancelling Call Forwarding.
And that’s what you need to know about Call Forwarding on NEC DSX business phones. For more information, please see your System Administrator.
For a vast selection of NEC phones and other telephone systems and equipment, please visit Startechtel.com or call 800-564-8045. You may also connect with us on Facebook, Google+, Twitter, LinkedIn, and Pinterest.
Posted in Business Communications, NEC Business Phones, Refurbished Phone System Equipment | Comments Off on Call Forwarding On The NEC DSX Phone
Accessing Voicemail On the Polycom VVX 400-410 Phones
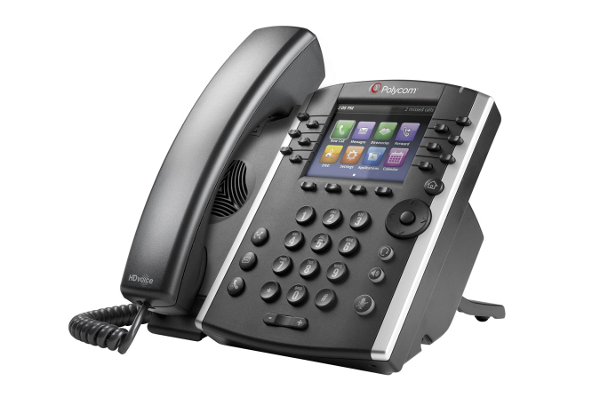 When choosing an office phone for your business, excellent features and convenient functions are key. With the Polycom VVX 400 and 410 phones, you get an affordable phone with a sleek design and smart features. Of these features is the easy-to-use voicemail, which allows you to receive important messages when you are away from your desk or out of office. To learn how to access your Polycom voicemail, follow these steps.
The Polycom VVX 400 or 410 phones may indicate new voicemail messages by the following:
- A message in the status bar – the message indicates the number of new messages you have. The count is a total of all messages on all lines on the phone.
- A flashing Message Waiting Indicator, located at the top-right of your phone.
- An audible alert (if you phone is on-hook).
Note: To temporarily remove the message counter, press Messages (envelope icon), and select Message Center (or select Messages from Home view, and select Message Center) and press Clear. After a period of time – usually about an hour or two – the message indicators will display again.
To listen to voicemail messages:
- Press Messages (envelope icon), and select Message Center. Or, from Home view, select Messages, and select Message Center.
- If multiple lines are configured on your phone, the Line Select screen displays. Use the up and down arrow keys to select the line that has the message.
- From the Messages screen, press Connect and follow the prompts.
And that is how you access your voicemail on the Polycom VVX 400 and 410 phones. If you have any further questions, please see your System Administrator.
Find a vast selection of new and refurbished business phones and systems, featuring top brands like Polycom, online at Startechtel.com. If you have any questions or need assistance, please call 800-564-8045. You may also connect with us on Facebook, Google+, Twitter, LinkedIn, and Pinterest.
Posted in Business Communications, IP/VoIP Phones | Comments Off on Accessing Voicemail On the Polycom VVX 400-410 Phones
Thank You From Everyone At Startechtel.com!
 The holiday season is here and the end of the year is just around the corner, making it a great time to reflect on the year we have had. After decades of providing quality new and refurbished business phone systems and more, we are in awe of how far we’ve come thanks to our hardworking staff and your steadfast support. From the bottom of our hearts, Startechtel.com would like to thank you.
Please remember that our offices will be closed on Thursday, November 22 and Friday November 23, 2018, for the Thanksgiving holiday. Our normal business hours will resume on Monday, November 26, 2018. We apologize for the inconvenience and appreciate your understanding.
Everyone at Startechtel.com wishes you a happy Thanksgiving filled with blessings and joy!
Posted in Holidays | Comments Off on Thank You From Everyone At Startechtel.com!
Using Speed Call Keys On The Mitel Superset 4025 Phone
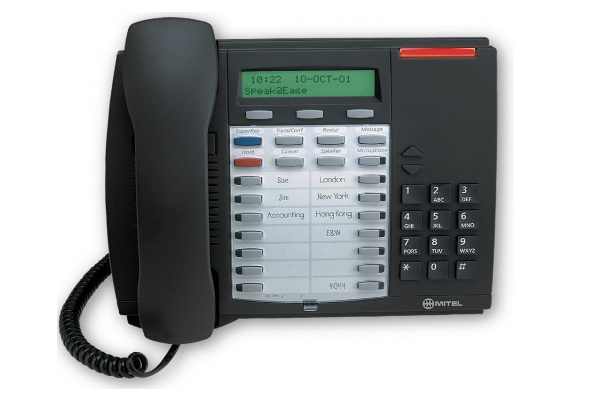 The Mitel Superset 4025 phone is aptly designed to cater to the needs of the busy worker. From advanced features to flexibility and convenience, this Mitel phone is a perfect fit for various office environments.
Of its excellent features are the Speed Call Keys, which allow you to store external numbers under feature keys for faster dialing. You may use Speed Call Keys to make a call or to send a string of digits, such as a password, during a call.
To store a Speed Call number:
- Press SUPERKEY.
- Press the No softkey until “Personal Keys?” appears.
- Press the Yes softkey.
- Press a personal key that isn’t a line key.
- Press the Change softkey.
- Press the Yes softkey.
- Do one of the following:
• To store a new number, enter “9” or other digit(s) used to access an outside line (if required) followed by the telephone number. Press HOLD between digits to create a one-second pause during dialing — press HOLD more than once to lengthen the pause.
• To enter the last number dialed, press REDIAL. - If you want the number of be private, press the Priv softkey.
- Press the Save softkey.
- Press SUPERKEY.
To dial a Stored Speed Call number:
1. Lift the handset.
2. Press a Speed Call key.
Speed Call – Personal
To store a personal Speed Call number:
- Lift the handset.
- Dial 51.
- Enter an index number between 1 and 5.
- Enter “9” or other digit(s) used to access an outside line (if required) followed by the telephone number. Press HOLD between digits to create a one-second pause during dialing — press HOLD more than once to lengthen the pause.
- Hang up.
To dial a stored personal Speed Call number:
- Lift the handset.
- Dial 52.
- Enter an index number between 1 and 5.
And that is how you use the Speed Call keys on the Mitel Superset 4025 phone. If you have any further questions, please see your System Administrator.
For affordable prices on the Mitel Superset 4025 phone and other new and refurbished business phones and equipment, please visit Startechtel.com or call 800-564-8045. You can also connect with us on Facebook, Google+, Twitter, LinkedIn, and Pinterest for the latest updates.
Posted in Business Communications, Mitel Phones | Comments Off on Using Speed Call Keys On The Mitel Superset 4025 Phone


