NEC DT300 Series: Phone Call Basics For The NEC DTL-12D-1 Phone
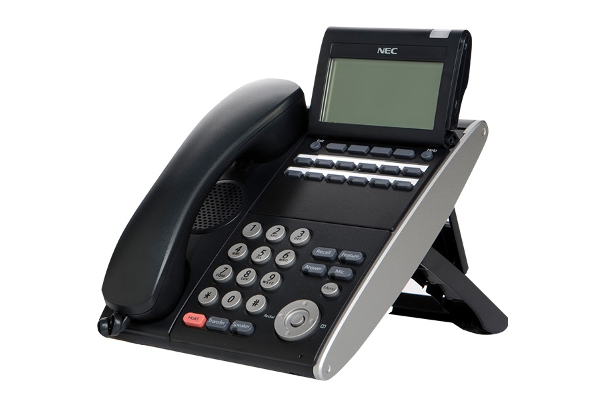 Nearly all businesses rely on office phone systems for reliable communication within the company as well as with clients and customers. Because of this, call handling is ever important. Knowing how to make, answer, and transfer calls on your business phones is crucial to success and can directly impact the customer experience. If your business uses the NEC DT330 12-Button Display Phone, here are the simple steps on how to make, answer, and transfer your important business phone calls.
Make A Call
Internal Calls:
- Press the DSS (Direct Station Select) button of the person you wish to call. You may talk hands free after the tone, or lift the handset.
OR
- Lift the handset or press SPEAKER and then dial the 3-Digit Extension Number.
- The Softkeys allow the following options:
- Ring/Voice – toggles from Handsfree to Ringing
- MW – turn callback message waiting lamp on
- Vmsg – leave Voicemail Message
External Calls:
- Lift the handset or press SPEAKER. Dial 9 followed by the telephone number.
OR
- Press the idle CO Line key and dial the telephone number. You may lift the handset or talk hands free.
Answer A Call
Internal Calls:
- When a phone beeps, answer hands free or, if the phone rings, lift the handset or press SPEAKER.
External Calls:
- When phone rings, lift the handset or press the SPEAKER button to answer hands free.
**Note: The MIC lamp must be ON for callers to hear you hands free (press the button to toggle on/off).
Transfer A Call
To transfer a call to another extension:
- With the call in progress, press the DSS button (you can transfer to a busy station). If there is no DSS button, press the Trf softkey or TRANSFER button then dial the 3-digit Extension Number.
- The Caller is then placed on Hold.
- You may announce the caller. Or to cancel and get the caller back, press the blinking green button.
- Press the Trf Softkey or TRANSFER button then hang up the handset to complete the transfer.
To transfer a call directly to Voicemail:
- With the call in progress, press the DSS button (you can transfer to a busy station). If there is no DSS button, press the Trf softkey or TRANSFER button then dial the 3-digit Extension Number.
- Dial 8 and hang up the handset to complete the transfer to Voicemail.
And that is how you make, answer, and transfer phone calls on your NEC phone. To purchase the NEC DTL-12D-1 phone or browse our other new and refurbished business phones and equipment, please visit Startechtel.com. Please call 800-564-8045 to speak with a representative and connect with us on Facebook, Google+, Twitter, LinkedIn, and Pinterest for the latest news and updates!
Posted in Business Communications, Business Tips, NEC Business Phones | Comments Off on NEC DT300 Series: Phone Call Basics For The NEC DTL-12D-1 Phone
Nortel Networks Phone Manual: Call Forwarding On The Nortel M3904 Phone
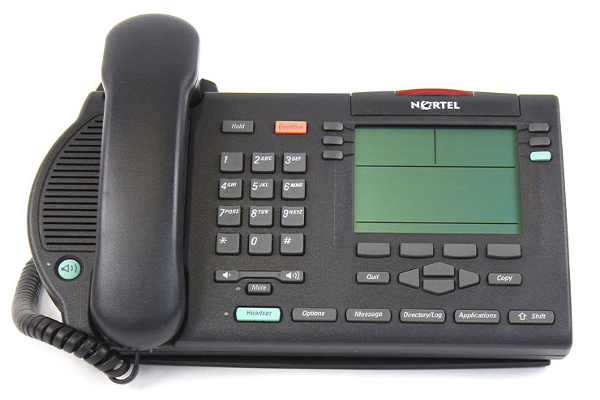 The Nortel M3904 phone is an ideal addition to any office phone system. Boasting a smart design including six Programmable Line (DN)/Feature Keys (self-labeled) with two features/lines configured on each key, this quality business phone offers convenience and simplicity for your employees.
Call Forward
One of its helpful features is Call Forward. This allows you to direct your calls to ring at another line/ directory number (DN). Please note that you cannot forward calls while your telephone is ringing.
To forward your calls, begin by pressing the Forward Key. The previously stored forward number appears (if applicable) and the screen displays “Enter forward number“. If desired, enter a new number (the existing number will be deleted automatically). If you make a mistake, use the Delete Key to delete the previous digit(s). Press Cancel to leave this screen without forwarding your telephone or changing the number. Press the Done Key to activate Call Forward.
To view the number that your calls are being forwarded to, press the Check Forward (CheckFw) Key. The number will be displayed on the screen. Press the Exit Key to return to the previous screen (Note: This will leave Call Forward active).
To cancel Call Forward, press the Check Forward (CheckFw) Key, the press the Cancel Forward (CanclFw) Key.
Internal Call Forward
This feature allows only calls originating at internal DNs to ring at another DN. Calls originating outside of your Meridian 1 System will still ring at your telephone. Again, please note that you cannot forward calls while your telephone is ringing.
Begin by pressing the Internal Call Forward (IntForward) Key. Next, dial the DN where you want to forward your calls. Lastly, press the Internal Call Forward Key.
To cancel Internal Call Forward, press the Internal Call Forward (IntForward) Key.
To reinstate the Internal Call Forward to the same number, press the Internal Call Forward (IntForward) Key twice.
Please note: The Meridian SL-100 uses the Call Forward Busy/Don’t Answer – Internal/External FAC. This allows Meridian SL-100 user to:
- Forward an incoming call which originated internally from a DN in the same customer group as you.
- Forward an incoming call which originated externally from a DN out of your customer group to a DN outside your customer group.
Remote Call Forward
This feature allows you (from any telephone other than your own) to forward your calls to any telephone. To use this feature you must have a Call Forward Key configured on your telephone.
Please note: On the Meridian SL-100, dial the Remote Access Directory Number. You are prompted to enter the directory number of your telephone, your PIN, and the Call Forwarding authorization code. Follow the prompts to activate, deactivate, or change call forwarding to a new destination.
To activate Remote Call Forward, start by lifting the handset. If you call from a telephone outside the system, first dial your Direct Inward System Access number and wait for dial tone. Next, dial the to activate the feature. Then, dial your Station Control Password. You should hear a dial tone, and then you may dial your DN. Next, dial the number where you want to forward your calls (if you would like to forward calls to a previous call forward number, skip this step). If you forward calls to an invalid number, you will hear a fast busy tone. Lastly, press the # Key.
To cancel Remote Call Forward, lift the handset. If you call from a telephone outside the system, first dial your Direct Inward System Access number and wait for the dial tone. Next, dial the Remote Call Forward Deactivate FFC. Then, dial your Station Control Password, wait for a dial tone, and then dial your DN. Lastly, press the # Key.
And that is how you use the Call Forward features on the Nortel M3904 phone. For the best prices on the Nortel M3904 phone and other new and refurbished business phones, please visit Startechtel.com or call 800-564-8045. For the latest news and updates, connect with us on Facebook, Google+, Twitter, LinkedIn, and Pinterest.
Posted in Business Communications, Nortel Networks | Comments Off on Nortel Networks Phone Manual: Call Forwarding On The Nortel M3904 Phone
How To Access & Use Allworx Voicemail
 Voicemail is a significant and helpful feature for businesses. By providing a sufficient and easy-to-use voicemail system, you ensure that important calls are not missed and necessary voice messages can be sent within the employee network. For those using Allworx business phone systems, the Allworx All-In-One voicemail is a smart choice. Simple and straightforward, employees will appreciate the convenience it provides. Follow along as we take you through the steps to access and use the Allworx voicemail system.
Log In
To log in to your Allworx voicemail, use any activated telephone within your system and dial 6 followed by your extension number.
If you are calling from outside of the organization, you will hear the standard welcome greeting. Press 6 followed by your extension number.
Enter or spell your password using the telephone and the press #.
You will hear an announcement indicating the number of new and saved messages in your voicemail inbox, and the number of messages in your email inbox. The system will then prompt you with the following options:
- Press 1 to play messages
The system will announce the time the message was received, and then play the message. After hearing the message, select from the following options: - Press 1 to reply to this message
- Listen to the instructions then record your message. Press # when you have finished.
- Select one of the following options for sending your reply:
Press 1 or hang up to send your message
Press 2 to review your message
Press 3 to change your message
Press # to cancel sending your message
Press * to listen to these choices again
- Press 2 to forward this message
- After the Allworx prompt, enter the first extension number to which you wish to forward the message. The system will play the selected user’s name and prompt for the next extension number. You can enter another extension number or press the # key to finish entering forwarding extension numbers. Repeat this process until all extension numbers are entered.
- When you are finished entering extension numbers, you will be prompted to record a message to precede the forwarded message. Record your message at the beep, then press # when you have finished.
- Press 3 to delete this message
- Press 4 to replay this message
- Press 5 to play the previous message
- Press 6 to play the next message
- Press 7 to rewind the message 10 seconds
- Press 8 to advance the message forward 10 seconds
- Press 9 to place a call to the message sender (only applies to messages sent by other Allworx users)
- Press # to return to the previous menu
- Press * to listen to these choices again
- Press 2 to skip to playing saved messages
- Press 3 to send a message
The system will prompt you to enter the first extension number or Alias number to which you wish to send the message. Press 9 to send your message to all voicemail users.
Enter the first extension number. The system will confirm your entry and prompt you to enter another.
Enter the next extension or Alias number. Repeat this process until all extension or Alias numbers have been entered. When the last number has been entered, press # to indicate you are ready to record your message.
You will be prompted to begin recording. When you are finished, press #.
You will be prompted to complete the process as follows:- Press 1 or hang up to send a message
- Press 2 to review your message
- Press 3 to change your message
- Press # to cancel sending
- Press * to listen to these choices again
- Press 4 to change your Message Center system settings
The system will announce the following options:- Press 1 to change your password
- Press 2 to change the recording of your name
- The system will play your current name recording for your review and offer the following options:
Press 2 to change your name recording - Listen to the instructions and record your name. Press # when you have finished. The system will offer the following options:
- Press 1 to save your name recording
- Press 2 to change your name recording
- Press 3 to review your name recording
- Press # to cancel changing your name recording
- Press * to listen to these choices again
- Press 3 to review your name recording
- Press # to cancel changing your name recording
- Press * to listen to these choices again
- The system will play your current name recording for your review and offer the following options:
- Press 3 to change your outgoing message recording
The system will play your current message for review and offer the following options:- Press 2 to change your outgoing message
- Listen to the instructions and record your new message. Press # when you have finished. The system will offer the following options:
- Press 1 to save your outgoing message
- Press 2 the change your outgoing message
- Press 3 to review your outgoing message
- Press # to cancel changing your outgoing message
- Press * to listen to these choices again
- Listen to the instructions and record your new message. Press # when you have finished. The system will offer the following options:
- Press 2 to change your outgoing message
- Press 3 to review your outgoing message
- Press # to cancel changing outgoing message
- Press * to listen to these choices again
- Press 4 to change the maximum recording time for messages
- Press * to listen to these choices again
- Press 9 or hang up to end your call
- Press * to listen to these choices again
And that is how to access and use your Allworx All-In-One voicemail. For further information, please refer to your Allworx 10x User Guide or see your System Administrator.
Visit Startechtel.com to shop our selection of Allworx VoIP phone systems for your business. To place an order over the phone, please call 800-564-8045. For the latest news and updates, connect with us on Facebook, Google+, Twitter, LinkedIn, and Pinterest.
Posted in Allworx, Business Communications, Business Phone Systems | Comments Off on How To Access & Use Allworx Voicemail
Changing The Time/Date On The Tadiran FlexSet 280S Phone
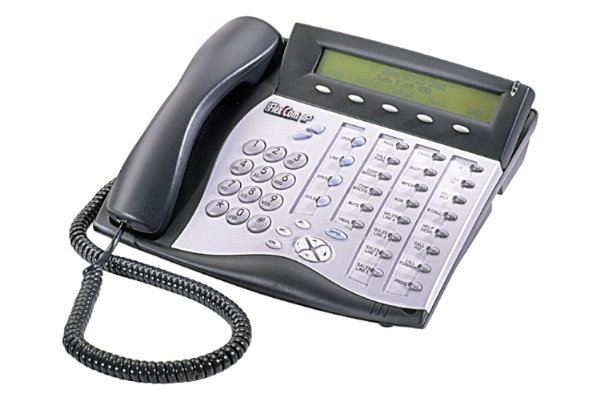 The Tadiran Telecom FlexSet 280S phone offers state of the art technology while remaining simple and easy to use. Ideal for the typical office environment, you will learn that investing in this fully functional keyset will deliver the best features and functions to suit your needs. Learn how to change the date and time on your Tadiran FlexSet 280S phone by following these simple steps.
Please note that the System Controls allows the attendant to program certain features (including the Time/Date Set) for system-wide operations.
Setting/Changing The Time
- To set the time, first press Time.
- Next, dial the time (4 digits, 12 hour clock) using leading zeros. For example, for 5 past 8, dial 0805.
- Then, choose AM or PM.
- Next, press Set and listen for the confirmation tone.
Setting/Changing The Date
- To set the date, press Time, and then select SetDte.
- Next, dial the date in the 6 digit format (either mm:dd:yy or dd:mm:yy depending on your system set up) and remember to use leading zeros. For example, May 26, 2002 should be entered as 052602 in North America.
- Then choose Set and listen for the confirmation tone.
And that’s how you change the time and date on the Tadiran phone. To find great pricing on our refurbished Tadiran FlexSet 280S phone and other new and refurbished phones, please visit Startechtel.com or call 800-564-8045. Find & follow us on Facebook, Google+, Twitter, LinkedIn, and Pinterest.
Posted in Business Communications | Comments Off on Changing The Time/Date On The Tadiran FlexSet 280S Phone
How The Polycom SoundStation Changed Conferencing
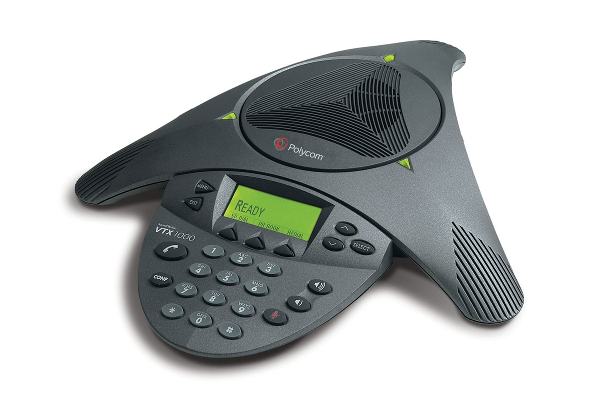 The introduction of the Polycom SoundStation conference phone had a significant impact on the telecom industry. These days, thanks to numerous advances in technology, we have a bevy of collaborations tools at our fingertips, making communication more convenient. However, not too long ago, this type of collaboration was limited to old-fashioned telephony. It wasn’t until the early 1990s, when Polycom introduced the SoundStation, that things began to change.
The SoundStation was Polycom’s first speakerphone and emerged in a time where videoconferencing over dial-up phone lines was the way to collaborate. Also during this time, speakerphones did not allow more than one person to speak at a time, and thus, forced users to be close to the device.
Since most other companies were focused on videoconferencing, Polycom decided to target audio systems and create a new kind of speakerphone. This venture began with an open-air conference system, which focused on a single-user conference system that could be used in an office and connected to a telephone through the handset.
Because Polycom wanted to achieve “real transparent audio performance” they needed acoustic echo-canceling technology, which, at the time, was still in its infancy and required extensive digital signal processing. This technology would essentially build a room model to figure out what the echoes will be in order to predictively cancel them out before they reach the microphone. Because of the complex nature of this technology, the echo-canceling speakerphones on the market were more expensive, but Polycom wanted to offer a more affordable option with better performance.
In 1991, Polycom decided to transform its single-user device into a group-based system, which then became the SoundStation. Formally introduced in 1992, the SoundStation used full duplex technology, allowing more than one person to speak at a time. While competitors had good features, such as buttons for echo-canceling, the SoundStation performed echo-canceling on its own. The fact that the SoundStation could automatically and continuously recalibrate itself put it ahead of the others.
Over time, the need for speakerphones with clear audio increased, allowing Polycom to flourish. Technological advancements have enabled the SoundStation to improve and offer more diverse features and quality performance.
For more information on Polycom and the business and conference phones we offer, please visit Startechtel.com or call 800-564-8045. You can also connect with us on Facebook, Google+, Twitter, LinkedIn, and Pinterest.
Posted in Business Communications, Business Trends, Conference Phones | Comments Off on How The Polycom SoundStation Changed Conferencing
About The Avaya 9608G IP Phone
 The New Year is a perfect time to start fresh. For businesses, a new VoIP phone system might be in order. The Avaya 9600 Series IP deskphones offer excellent features and are ideal for businesses small and large. They provide touchscreen access to web-based applications, menus, calendars, and directories, along with high-quality calling and messaging. If you are looking for a cost-effective, fully functional phone with support for integrated gigabit, the Avaya 9608G IP phone is the answer.
This 8-line phone is suited for the worker who relies on the phone as a useful and necessary communication tool day to day. With a monochrome display plus four softkeys and room for up to three 12- or 24-button Expansion Modules, this IP phone can grow with your business.
Key Features Of The Avaya 9608G IP Phone
- High definition audio for quality calls.
- Simplified call controls via display and softkeys (ex. Transfer, Conference, Forward).
- 8 dual-color Red/Green LED buttons offer visual cues.
- Secondary Gigabit Ethernet port for PC improves flexibility.
- Accommodates advanced unified communications solutions with Session Initiation Protocol (SIP) based infrastructure on the Avaya Aura platform.
- Power-over-Ethernet Class 1 design with “sleep mode” provides reduced energy consumptions and lower costs.
To learn more about the , and the other Avaya business phones we carry, please visit Startechtel.com. To speak with a representative, please call 800-564-8045.
For the latest news and updates, connect with us on Facebook, Google+, Twitter, LinkedIn and Pinterest.
Posted in Avaya, Business Communications, IP/VoIP Phones | Comments Off on About The Avaya 9608G IP Phone
How To Setup The Comdial DX-80 Auto Attendant
 Businesses that rely heavily on their Comdial telephone system to reach customers and clients may find the Comdial DX-80 Auto Attendant very helpful. The Auto Attendant acts as a virtual receptionist, answering incoming calls with pre-recorded messages and prompt and routing them appropriately. Whether it is used to mitigate overflow call traffic, after hours, or for full receptionist duties, you will find that both your employees and callers will benefit from the convenience of Auto Attendant.
How It Works
When an incoming call rings, the Auto Attendant will answer the call by going “off-hook” and greet the caller with a pre-recorded greeting (DAY/ALT/EVE).
Following the greeting, the caller will then be prompted to either dial the extension of the party they are trying to reach or choose from a list of voiced options to route their call to a specific department or group.
The Auto Attendant then listens to the digits dialed by the caller and plays the pre-recorded phrase “Please hold…” (WAITING MSG)
Next, the Auto Attendant calls the required extension by hook-flashing and dialing the extension number, and listens for a busy tone, ring tone, answer, etc.
If the extension is busy, the caller hears the BUSY MSG. If the extension does not answer, the caller hears the NO ANSWER MSG.
Messages & Greetings
Here are the different types of messages/greetings you can record:
DAY GREETING – This is the greeting callers hear when your system is in “DAY” mode (i.e. during business hours).
ALT GREETING – This is the greeting callers hear when your system is in “ALTernate” mode.
EVE GREETING – This is the greeting callers hear when your system is in “EVEning” mode (i.e. after hours).
WAITING MSG. – This is the message callers hear after their call has been processed.
INVALID MSG. – This is the message callers hear when that have dialed a number that is not defined in the DX-80 system directory.
BUSY MSG. – This is the message callers hear when they have dialed an extension number that is busy.
NO_ANS MSG. – This is the messages callers hear when the extension they entered does not answer the call. Another extension request may be made at this time.
BYE MSG. – This is the message callers hear when the DX-80 system is about to disconnect them. This occurs when the caller dials nothing after a Busy Message or No Answer message has been played.
INQUIRY MSG. – This is a special message that can provide callers with information without ever having to be handled by a live person (ex. directions to the office, office hours).
TEMP MSG. – This is a message that can be used to announce periodic or planned events (ex. holidays).
Setup
Enter Attendant Administration from any digital speakerphone.
Press ! [#] [0].
Enter the Tenant Group (1, 2, or 3) for which settings will be made and then press [save].
Enter the Attendant Password for the selected Tenant Group.
Press [show]. The display should read “SVC MODE CHANGE.”
Press [next]. The display should read “AUTO_A MESSAGE.”
Press [show]. The display should read “1.DAY GREETING.” Please note that the button LED is lit during Automated Attendant setup session, indicating that the speakerphone microphone will be active during the record portions of set up. Alternatively, the handset may be used for recording.
To record this greeting, press [show]. The display will show “RECORD TIME :xx” (xx=current time allotted to this message).
To change the total length allotted to this message, press [chg]. Enter the new time in seconds (00-99) then press [save].
Press [play] to hear the current contents of this greeting/message.
The display shows “AUTO_ATT NO. :1” indicating that you will hear the recorded greeting for the first port. Keep in mind that there are four ports. Each recorded simultaneously during the “record” operation. You may use the [chg] function to playback each individual port to test each for proper operation.
Press [record] to begin recording this greeting (recording begins immediately). (Note: The length of the message/greeting recorded cannot exceed the allotted time length for this message/greeting). Press [stop] to end the recording of this message. (Note: if the Record Time is exceeded, the record operation will end automatically).
Press the HOLD button to return to the previous level of setup (“1.DAY GREETING”).
To skip to the next greeting/message, press [next]. The display will show “2.ALT GREETING.”
Follow the aforementioned steps to playback and record all greetings/messages.
When finished, press or hang up the handset to end the setup session.
If you have any questions regarding your Comdial system or Auto Attendant, please contact your system administrator.
Get the Comdial DX-80 Auto Attendant and other Comdial phones and equipment online at Startechtel.com. To place an order over the phone, please call 800-564-8045 to speak with our sales team.
Posted in Business Communications, Refurbished Phone System Equipment | Comments Off on How To Setup The Comdial DX-80 Auto Attendant
Get To Know The Mitel 5330E IP Phone
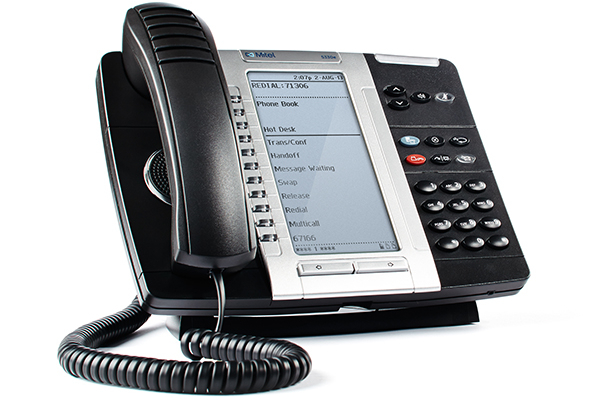 If you are thinking about or moving forward with upgrading to a VoIP phone system, you should consider choosing the Mitel 5330E IP phone for your business. Boasting full-feature, dual port, and dual mode enterprise-class applications, the Mitel 5330E IP phone makes a great addition to the office. Your employees will enjoy the benefits of a large backlit graphics display (160 x 320) which features auto dimming, along with 24 programmable, multi-function, self-labeling keys and more.
The Programmable Feature Keys and Softkeys are situated to the left of the large screen (11).
- The top three buttons are Softkeys which allow you to access specific call control features (non-programmable feature keys).
- The bottom eight buttons are the Programmable Keys. There are 8 per page for a maximum of 23 programmable keys plus 1 prime line key (bottom left feature key). These launch specific call control features and can be programmed using the Settings application or the Unified Communicator Express application.
On the right side of the phone, you will find the keypad at the bottom. Just above that are the Fixed Function Keys (6).
- The MENU button provides access to menus for your phone’s applications and settings.
- During a call, the CANCEL button ends a call. When programming the phone, it eliminates any input and returns to the previous menu level.
- The REDIAL button calls the last number dialed.
- The HOLD button places the current call on hold.
- The TRANS/CONF button initiates a call transfer or establishes a three-party conference call.
- The MESSAGE button provides access to your voice mailbox and flashes to notify you of messages waiting in your voice mailbox. Note: The Ring/Message Indicator (located at the top right of the phone) also flashes when messages are waiting.
Lastly, above the Fixed Function Keys are the Navigation Page Keys. Use these (Back/Next) to display additional pages of information.
Visit Startechtel.com to order the Mitel 5330E IP phone, or browse our selection of VoIP business phones. If you have any questions, please feel free to contact us 800-564-8045. For the latest news and updates, find and follow us on Facebook, Google+, Twitter, LinkedIn and Pinterest.
Posted in Business Communications, Business Tips, IP/VoIP Phones | Comments Off on Get To Know The Mitel 5330E IP Phone
Must-Have Attributes For Video Conferencing
 Successful businesses utilize efficient telephone systems in order to maintain quality communication within the company as well as with customers and clients. Aside from the traditional telephone systems, video conferencing solutions can help enhance interactions. Rather than just simple conference calls, enabling a video conference is more engaging and mimics face-to-face meetings for improved communication.
To invest in the best video conferencing solutions for your business, be sure that your solution possesses these attributes:
Reliability & Quality
It is agreed that a system that is reliable and delivers quality performance is invaluable. With a reliable system, end-users can focus on their work while IT need not worry too much about issues and troubleshooting. The quality and reliability of a system can positively impact efficiency as well. Decreased problems eliminate delay and downtime, thus increases time for productivity.
Security
Quality and reliability can only go so far without security. Keeping business data safe and secure is a top priority. Security features should include strict sign-on procedures and encryption, plus role-based access and administrative controls should also be considered. In addition, management should ensure that all employees and staff are following proper security protocol.
Affordability
What good is a video conferencing solution if you can’t afford it? In most cases, you get what you pay for when it comes to technology. However, the market for video conferencing solutions is relatively competitive and can suit varying budgets.
Ease Of Use & Likelihood Of Adoption
If these systems are easy to use, the likelihood of adoption increases. Aside from a user-friendly interface, these systems should also offer flexibility and accessibility. For example, meetings should be easy to schedule and include intuitive controls such as screen sharing, video streaming, co-annotation and chat.
Interoperability
In a way, this goes without saying as it relates to the aforementioned attributes. Your video conferencing solution should be able to work with other tools and systems within your business, such as CRM platforms and calendar applications.
What are some of your must-haves for video conferencing solutions? Share with us on Facebook, Google+, Twitter, LinkedIn, and Pinterest.
If you need quality conferencing phones and business phone equipment for your office, feel free to browse our selection at Startechtel.com. If you have any questions about our products, or need assistance with your order, please contact us at 800-564-8045.
Posted in Video Conference, Video Conferencing | Comments Off on Must-Have Attributes For Video Conferencing
Benefits Of VoIP Phone Systems
 Does your business still use a landline phone system? Does your business rely on the Internet and high-speed data? You may want to consider upgrading to a VoIP phone system -here’s why.
• Saves Money
There are many ways VoIP can save you money, with the most obvious being that calls are routed over the Internet. Because you will be using your existing data network, local calls will be free and international calls will cost significantly less than they normally do.
• Offers Flexibility
You can make nearly any device a VoIP phone by enabling mobile and desktop VoIP applications on smartphones, desktops, and tablets. In-office and especially remote employees will benefit from this as access to a desk phone is not always feasible. Employees on the go can easily and seamlessly transfer their calls between desk phones to smartphones and vice versa.
• Improves The Customer Experience
For businesses, the customer experience is ever important, and VoIP systems can help to improve that. VoIP phone systems enable businesses to record customer conversations, which can be utilized for various reasons, including employee training, to identify frequently asked questions, understand common issues, and recall previous conversations for more personalized interactions. All of these contribute to a better customer experience overall.
• Increases Productivity
By implementing a VoIP phone system, call will become more efficient by allowing more than just a verbal discussion. With VoIP, you can take advantage of video calls, easily share documents, and record a conversation as a means of taking notes during a meeting. In addition to this, call quality is much better with VoIP, which means better clarity, less dropped calls and no transmission lag.
• Access To Advanced Features
Most of us know that landline phone features are rather limited, especially in comparison to VoIP phones. With VoIP, you can conveniently have your voicemails transcribed and delivered to your email. You may also integrate your VoIP system with other software and applications (ex. Salesforce, Office 365, Freshdesk).
If you need help choosing a VoIP phone system, or would like to discuss our products and services, please call 800-564-8045 to speak with a representative.
You can also shop our stock of popular new and refurbished business phones online at Startechtel.com and connect with us on Facebook, Google+, Twitter, Linkedin, and Pinterest.
Posted in Business Phone Systems, Business Tips, IP/VoIP Phones, VoIP Phone Systems | Comments Off on Benefits Of VoIP Phone Systems


